Minimig v1.1 - Information and Firmware
From Wikipedia:
Minimig (short for Mini Amiga) is an open source re-implementation of an Amiga 500 using a field-programmable gate array (FPGA).
Minimig started around January 2005 as a proof of concept by Dutch electrical engineer Dennis van Weeren. He intended Minimig as the answer to the ongoing discussions within the Amiga community on implementing the
Amiga custom chipset using an FPGA. The project's source code and schematics were released under version 3 of the GNU General Public Licence on 25 July 2007.
I bought a Minimig v1.1 board around 2008 with the intention of using it as the basis of a portable Amiga 500, but it never really progressed beyond a basic (messy!) prototype. As such it then went into a box of parts, put in the attic, and forgotten about for many years.
Unfortunately, in 2024, the FPGA Amiga scene has moved on massively, and there is not a great deal of documentation or software to be found very easily for these original boards. This problem is further exacerbated by the fact that almost none of the released firmware or core files have been distributed with changes or readme files. So in many cases you are left guessing what the differences are.
PIC vs ARM controller
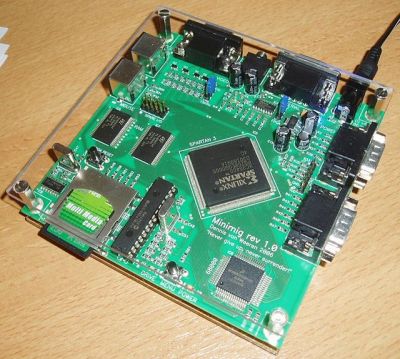
The original Minimig 1.0 and 1.1 boards had an actual Motorola 68SEC000 processor, the Xilinx Spartan FPGA and a PIC controller. The PIC was used to handle IO devices like the (emulated) floppies and hard disks, but it was soon found to be a limiting factor.
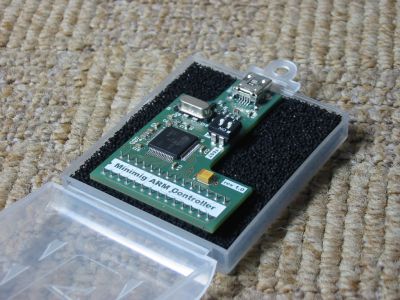
Later, an add-on board containing an ARM microcontroller was added in place of the PIC:
The ARM controller increased the number of emulated floppy devices as well as dramatically speeding up the emulated hard disk. Most newer models of the Minimig since 1.1 appear to have the ARM controller integrated, rather than using a PIC.
Therefore, there are two branches of firmware for the microcontroller; PIC and ARM. In the early days the main FPGA core was also tightly coupled to the firmware used for the microcontroller - you couldn't, for example, use an FPGA core that expected the PIC microcontroller with the ARM board, or vice-versa, unless the core was expecting it.
Unfortunately the shut down of the Minimig.net forums seems to have resulted in a lot of loss of information, so it is now really unclear what requirements the FPGA firmwares have. I have tried to collect the available core and ARM firmware files that are applicable to the original 1.1 boards here, in one place. In the absence of any historical information, I am assuming that in most cases, newer is better.
FPGA cores/files
This is the code which is written to the FPGA on boot, and sets up the Amiga hardware.
| Filename | Date | Source | Notes |
|---|---|---|---|
| minimig-rel4.zip | 14th February, 2016 | https://somuch.guru/minimig/original-minimig/ | Based on FSB150520 + boing4000 fixes + rkrajnc fixes. |
| fw140501.zip | 16th June, 2014 | https://www.minimig.ca/index.php/software/ | Listed as the latest available core in the “Minimig Software for Super PIC 18F26K20 and ARM controller” section. It is listed just as minimig1.bin, but is zipped with the date of the release here. |
| fyq100818.zip | 19th August, 2010 | https://www.minimig.ca/index.php/software/ | To be used with ARM firmware AYQ100818.zip. |
| fyq091224.zip | 24th December, 2009 | https://www.minimig.ca/index.php/software/ | To be used with ARM firmware AYQ091224.zip. |
| yq090911.zip | 13th September, 2009 | https://www.minimig.ca/index.php/software/ | Contains matching ARM and FPGA firmware. |
FPGA core files generally come as a 'minimig1.bin' file, and are simply copied to the root of the SD card. Most later ARM firmware allows browsing the SD card for alternative FPGA cores via the overlay menu, so it can be useful to install additional cores that you don't want to load as default, and have then selected from the menu (e.g. for compatibility with a particular game/application). The core file named 'minimig1.bin' will always be loaded by default at power-on.
ARM Controller firmware
This is the code which lets the ARM microcontroller emulate floppy and hard disks and provides the overlay menu which appears when pressing F12.
| Filename | Date | Source | Notes |
|---|---|---|---|
| arm_asb230428.zip | 28th May, 2023 | https://www.minimig.ca/index.php/software/ | Listed against the “1.1 to 1.8x Minimig board”. Described as “New ARM firmware”. Works with my v1.0 ARM controller and v1.1 Minimig board. |
| asb140501.zip | 16th June, 2014 | https://www.minimig.ca/index.php/software/ | Listed against the software section titled “Minimig Software for Super PIC 18F26K20 and ARM controller” boards. |
| ayq100818.zip | 19th August, 2010 | https://www.minimig.ca/index.php/software/ | To be used with FPGA firmware FYQ100818.zip. |
| ayq091224.zip | 24th December, 2009 | https://www.minimig.ca/index.php/software/ | To be used with FPGA firmware FYQ091224.zip. |
| yq090911.zip | 13th September, 2009 | https://www.minimig.ca/index.php/software/ | Contains matching ARM and FPGA firmware. |
ARM firmware is either written to the controller via the USB programming port, or, when the controller is already programmed, can be updated via the overlay menu itself (generally by naming the file 'firmware.upg' in the root of the SD card).
The microchip.com in-system programming tool sam-ba is used to initially write to a blank ARM controller. The original firmware installation guide is listed below for reference:
- ARM firmware guide (local copy) - from https://www.minimig.ca/software/Minimig-ARM-Programming.pdf
Additional Memory Installation
The original Minimig boards come with 2MB of SRAM installed, which is enough to implement a standard Amiga 500 (512K base) with an additional 1MB of RAM (i.e. 1.5MB). A further 512K of the installed 2MB is used to load the kickstart ROM image, so that is the full amount.
If you want to play with Workbench, have hard-disk installed games via WHDLoad or just later games with higher memory requirements then you need to add more memory. Since there is no expansion bus for the Minimig, the only way that was found to accomplish this on the early boards was to piggyback an additional pair of SRAM chips on top of the existing parts, and add code to the FPGA core file to enable CS (chip-select) lines to the new chips via a couple of free general-purpose IO pins found on the board.
This was well documented at the time the Minimig 1.0/1.1 boards were originally released, but it seems quite hard to track down the information now.
Video Output
The supported video output modes from the Minimig 1.1 are:
- 15KHz RGB+Sync, at 50Hz (PAL) or 60Hz (NTSC mode)
- 31KHz RGBHV (aka VGA), at 50Hz (PAL) or 60Hz (NTSC mode)
This is over the same, HD15/VGA style output connector. The VGA cable is a standard part, but if you want to use an RGB Scart TV/Monitor, then only a few suppliers still offer the VGA connector-to-RGB Scart cable.
Make sure that the display device you are using supports 50Hz at either 15KHz (most TV's will do this) or 31KHz. It's just out of the bottom of most modern LCD monitors display ranges. If you have trouble getting the Minimig to display at 50Hz, you can force it to start in 60Hz/NTSC mode (in most FPGA core versions) by holding F1 on the keyboard at power-on.

