PyCosworth Hardware Setup, an example
I can't tell you that there is one definite way to use PyCosworth; that's down to how best you think you can integrate it in your car. But I'll show you here how I'm using it, as well as a few ideas on what you can do with it.
Quick Links:
- Using a Raspberry Pi in-car, and how to power it
- Building a gauge pod to house an OLED screen and buttons
- My current setup, how my PyCosworth installation looks
Note: None of the examples here are necessary if you only intend to use PyCosworth on a laptop using the basic USB to serial cable connected to your ECU.
Connecting an SPI-based OLED Screen
TBC
Connecting an I2C-based OLED Screen
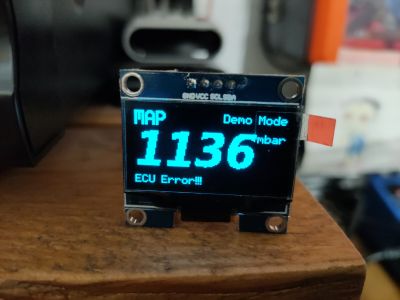
You can use PyCosworth without any display functions, but…. it would be pretty limited. Here's how you connect up a relatively standard OLED display when using PyCosworth on a Raspberry Pi.
Parts/Tools
- Raspberry Pi 3B+ (or similar later device)
- 4x Dupont cables/header cables/jumper cables
- SH1102, SSD1306 or similar 0.96“ - 1.3” 128×64 monochrome, I2C, OLED module
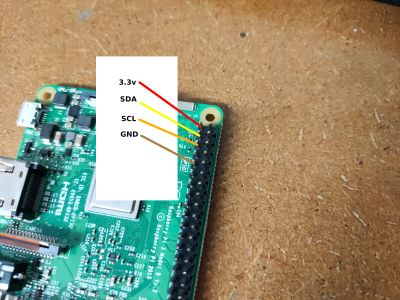
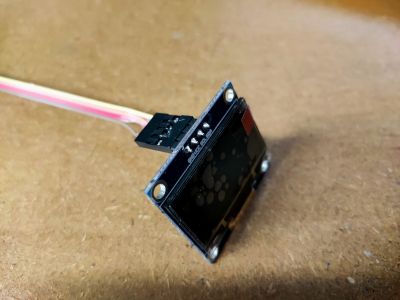
Images
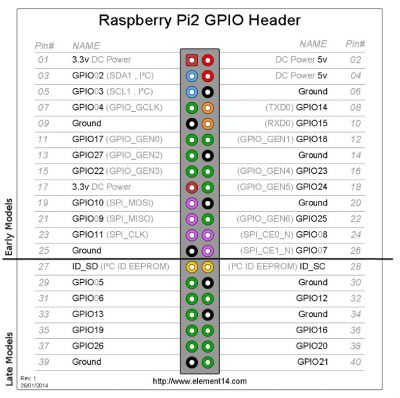
Connections
Most OLED displays follow the same approximate layout, but if in doubt consult the datasheet for your device. However, the standard pinout is usually:
| Device | Function | Pi Pin Number | Pi Pin Function |
|---|---|---|---|
| GND | Ground | 06 | Ground |
| VCC | +3.3V | 01 | +3.3V |
| SCL | Clock | 05 | GPIO #03 / I2C SCL |
| SDA | Data | 03 | GPIO #02 / I2C SDA |
Be careful - although the layout is mostly the same per OLED device, some similar models swap the VCC and GND pins.
In addition, if you want to do the same on a desktop PC or laptop, I have a guide on how to do that as well. Why would you want to do that? Well, it's far easier to program and debug user-interface elements or the workings of the graphical display routines when working on a PC.
Software Config
There are two steps to making the OLED device available to the application on the Pi; first is enabling the I2C serial bus that it is connected to, the second is configuring PyCosworth to use the device itself.
Configuring the Pi
To enable I2C support on the Pi, you must have the following entry in boot/config.txt:
dtparam=i2c_arm=on
You can also get better performance and faster screen refresh by increasing the clock speed of the I2C bus. You can achieve that by instead setting the following:
dtparam=i2c_arm=on,i2c_baudrate=400000
Configuring PyCosworth
Once you have I2C enabled and the OLED connected, you need to make sure that you can detect the screen. To do that, assuming you have connected the OLED module as above, run the following:
i2cdetect 1
Note: the Pi can have multiple I2C busses, but if you used Pin #03 and #05, you are using I2C bus 1, hence the above command.
It should print an output somewhat similar to below:
     0  1  2  3  4  5  6  7  8  9  a  b  c  d  e  f
00:          -- -- -- -- -- -- -- -- -- -- -- -- --
10: -- -- -- -- -- -- -- -- -- -- -- -- -- -- -- --
20: -- -- -- -- -- -- -- -- -- -- -- -- -- -- -- --
30: -- -- -- -- -- -- -- -- -- -- -- -- 3c -- -- --
40: -- -- -- -- -- -- -- -- -- -- -- -- -- -- -- --
50: -- -- -- -- -- -- -- -- -- -- -- -- -- -- -- --
60: -- -- -- -- -- -- -- -- -- -- -- -- -- -- -- --
70: -- -- -- -- -- -- -- --
In this particular case, it means that the OLED module has device ID 0x3c.
Now you can configure the PyCosworth configuration file in libs/settings.py with the following details:
# Replace these values with the correct pixel resolution of your OLED module
GFX_MASTER_SIZE = (128, 64)

GFX_MASTER_WINDOW = {
	'windowName'		: 'Master',
	'oledType'		: 'sh1106',		# Replace this with the model number of your OLED module
	'width'			: GFX_MASTER_SIZE[0],
	'height'		: GFX_MASTER_SIZE[1],
	'spiAddress'		: 0,
	'value_refreshTime'	: 0.05,
	'sdl_framebuffer'	: None,
	'luma_framebuffer'	: None,
	'luma_driver'		: None,
	'screen_refreshTime'	: 0.02,
	'i2cPort'		: 1,		# Replace this with the I2C bus you are connecting to. This is the default for Pi pins #03 & #05
	'i2cAddress'		: 0x3c,		# Replace this with the device ID of your OLED module as returned by i2cdetect
	'mode'			: [GFX_MODE_NUMERIC],
	'currentModeIdx'	: 0,
	'currentMode'		: GFX_MODE_NUMERIC,
	'sensorIds'		: ['AFR', 'AMAL', 'BAT', 'CO', 'ECT', 'IAT', 'IGNADV', 'INJDUR', 'MAP', 'RPM', 'TPS'],
	'currentSensorIdx'	: 0,
	'screen_cycleTime'	: 5,
	'value_refreshTime'	: 0.1,
	'screen_refreshTime'	: 0.05,
}
Note: I have currently only tested SH1102 and SSD1306 OLED modules. Others supported by Luma.oled should work.
Using a Raspberry Pi in-car
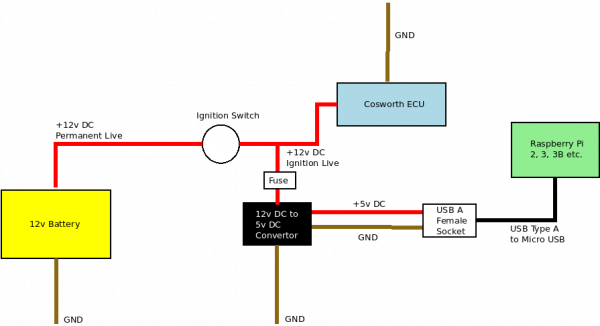
The bare minimum needed to get a Raspberry Pi powered and running in a car, direct from the 12v supply.
You could power the Pi from the battery, though you would need to add a physical power switch so as not to run the battery down, and also you don't get the benefit of the system powering-on automatically when the ignition (or accessory) feed is switched on. My preference is to use the ignition-live +12v supply, since it doesn't make any sense to power the Pi from the accessory feed as the ECU won't actually be powered at that point.
Parts/Tools
- Raspberry Pi 3B+
- 12v DC to 5v DC/USB convertor
- USB to MicroUSB adapter cable
Images
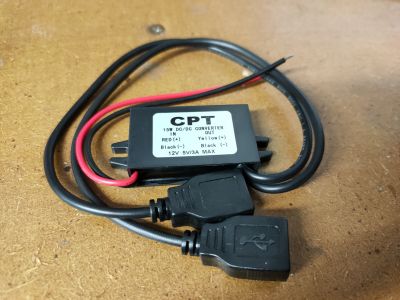
12v DC to 5v DC convertor:
The converter I bought already had female USB-A connectors (which makes it really easy to use with a Pi, phone, Go-Pro or similar devices), some come with bare wires on the output side, so with those you'd have to add on a barrel connector, USB socket or similar. Otherwise they are functionally identical.
Connections
All you need to do is find a +12v ignition live feed. You can either tap directly in to the ignition feed from the barrel, or, more sensibly, find another ignition live feed from your fusebox. Either way, you should feed the DC converter with a fused connection. Something in the range of 3-5A will be more than sufficient.
Using a Raspberry Pi in-car, reliably!
Although using just a 12/5V DC converter makes it really easy to use a Pi in-car, the electrical supply in a car is really quite unreliable; with all of the turning on and off, low voltages whilst cranking, etc. This is not great for a computer that has to maintain memory integrity, reliably read and write to disk. It's almost a certainty that at some point the Pi will crash or suffer disk corruption from power being pulled whilst it is doing something.
The only way around this is to run the Pi from some source that is independent from the ignition or battery of the vehicle. That would be easy with a second battery… but we don't really need to power the Pi continuously from another source… it's only in the event of the normal power disappearing unexpectedly that we need an alternative source.
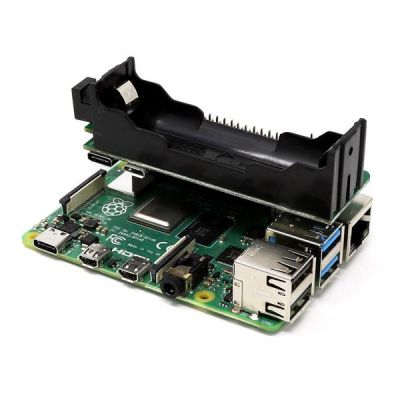
Fortunately there are a number of Raspberry Pi addons that can power the Pi from a (small) onboard battery pack… or give you enough time to shut the Pi down controllably in the event of power loss. I describe here how I am using the Super Watchdog V2 addon with PyCosworth.
Parts/Tools
- Raspberry Pi 3B+
- 12V DC to 5V DC converter
- Super Watchdog V2 hat
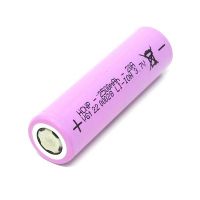
- 18650 Lithium-ion Rechargeable battery cell
- USB-A to 2.1mm barrel connector
Images
Connections
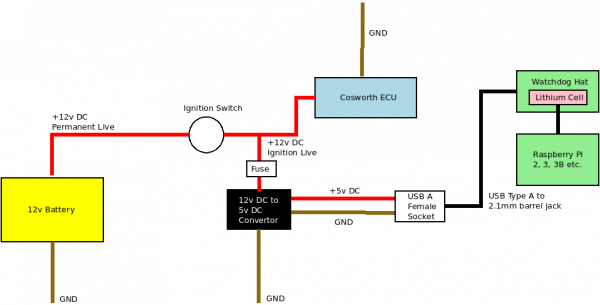
There aren't a great deal of differences to the connections needed when using the Watchdog hat - almost all of the differences are handled by physical connection between the hat and the Pi itself:
The only real difference is that if fitting the Pi inside a case, the Watchdog hat has a 2.1mm barrel connector that will make it much easier to add a panel-mounted connection to the outside world. You can use a USB-A to Micro-USB cable (the hat has connectors for both), but making you own micro-USB panel cutouts is a pain compared to drilling a single hole!
Software Configuration
The manufacturers of the Super Watchdog V2 make their software available from: https://github.com/SequentMicrosystems/wdt-rpi
However, to integrate with PyCosworth, only a single file is required. This (along with the relevant license file) has already been added to PyCosworth, so there are no additional downloads needed.
To enable support for the Super Watchdog V2, just open up the PyCosworth configuration file from libs/settings.py and change the following:
# Enable/Disable support for the Super Watchdog V2 Raspberry Pi hat
USE_PI_WATCHDOG = True
In addition, you may choose to alter the amount of time after the ignition is turned off until the Pi shuts down (as long as the lithium battery is charged!), you can do so by setting the following:
# How long to run the Pi on battery backup after a power-loss is
# detected, until we begin a controlled shutdown
WATCHDOG_POWER_SHUTDOWN_TIMER = 120
Note: if the power/ignition is restored before the countdown timer expires, the shutdown will be cancelled and PyCosworth will go back to normal operation. This is especially handy if you have your car in the garage for work, or for fault finding and are stopping and starting the engine regularly.
Other Considerations
One downside to using the Super Watchdog V2 hat is that it uses the pins that provide the I2C bus. Which, if you also want to use an I2C OLED module, will no longer be available.
If you want to use the Super Watchdog V2 and an I2C OLED module, then you need to make some small adjustments to your OLED connections and Pi configuration.
First, enable the (normally hidden) I2C interface with the following changes to boot/config.txt:
dtparam=i2c_vc=on,i2c_arm=on,i2c_baudrate=400000
Second, change the physical connection of your OLED module to use the following pins on the Pi:
| Device | Function | Pi Pin Number | Pi Pin Function |
|---|---|---|---|
| GND | Ground | 06 | Ground |
| VCC | +3.3V | 01 | +3.3V |
| SCL | Clock | 28 | I2C EEPROM SC |
| SDA | Data | 27 | I2C EEPROM SD |
Note: VCC and GND are unchanged, only the SCL Clock and SDA Data pins need changing.
Next, change your PyCosworth configuration in libs/settings.py to reflect the new I2C bus:
# Replace these values with the correct pixel resolution of your OLED module
GFX_MASTER_WINDOW = {
	'windowName'		: 'Master',
	'oledType'		: 'sh1106',		# Replace this with the model number of your OLED module
	'width'			: GFX_MASTER_SIZE[0],
	'height'		: GFX_MASTER_SIZE[1],
	'spiAddress'		: 0,
	'value_refreshTime'	: 0.05,
	'sdl_framebuffer'	: None,
	'luma_framebuffer'	: None,
	'luma_driver'		: None,
	'screen_refreshTime'	: 0.02,
	'i2cPort'		: 0,		# Replace this with the I2C bus you are connecting to. This is when using the normally 'hidden' I2C bus 0 on a Pi with pins #27 and #28
	'i2cAddress'		: 0x3c,		# Replace this with the device ID of your OLED module as returned by i2cdetect
	'mode'			: [GFX_MODE_NUMERIC],
	'currentModeIdx'	: 0,
	'currentMode'		: GFX_MODE_NUMERIC,
	'sensorIds'		: ['AFR', 'AMAL', 'BAT', 'CO', 'ECT', 'IAT', 'IGNADV', 'INJDUR', 'MAP', 'RPM', 'TPS'],
	'currentSensorIdx'	: 0,
	'screen_cycleTime'	: 5,
	'value_refreshTime'	: 0.1,
	'screen_refreshTime'	: 0.05,
}
Everything should be the same, but using I2C bus #0, rather than #1. Check that you can still find the OLED module using
i2cdetect 0

     0  1  2  3  4  5  6  7  8  9  a  b  c  d  e  f
00:          -- -- -- -- -- -- -- -- -- -- -- -- --
10: -- -- -- -- -- -- -- -- -- -- -- -- -- -- -- --
20: -- -- -- -- -- -- -- -- -- -- -- -- -- -- -- --
30: -- -- -- -- -- -- -- -- -- -- -- -- 3c -- -- --
40: -- -- -- -- -- -- -- -- -- -- -- -- -- -- -- --
50: -- -- -- -- -- -- -- -- -- -- -- -- -- -- -- --
60: -- -- -- -- -- -- -- -- -- -- -- -- -- -- -- --
70: -- -- -- -- -- -- -- --
Making a Gauge Pod
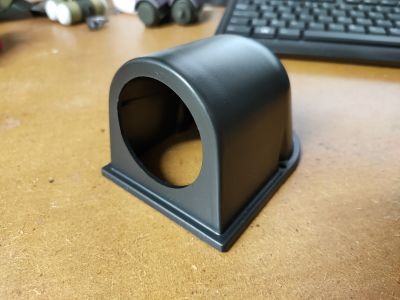
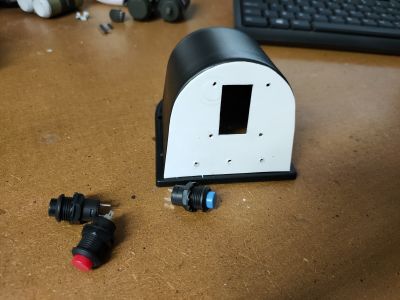
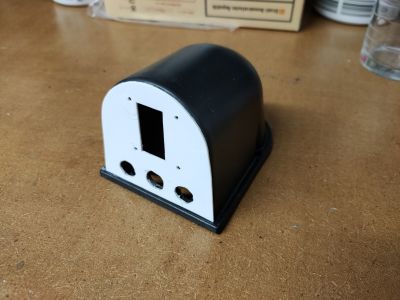
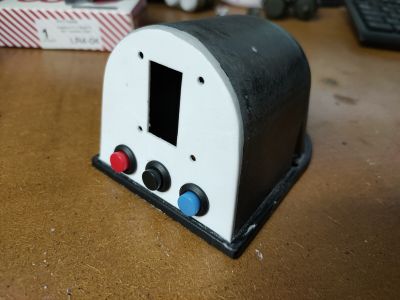
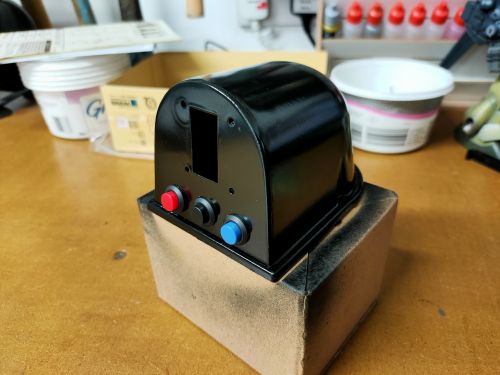
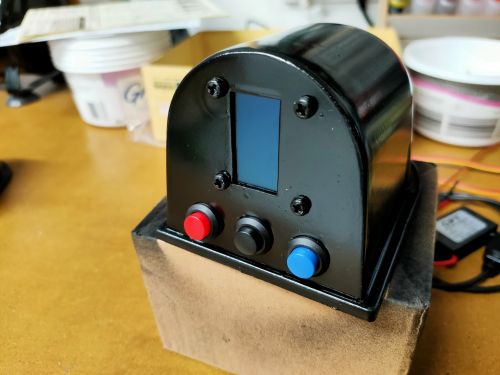
I wanted to keep all of the display/button/interface parts relatively self contained, so I picked a standard 52mm gauge pod, stuck a piece of plastic over the front and cut out the relevant holes for the SH1102 OLED module and a trio of buttons. The intention in my case is to mount this to the side of the centre console (hence the sideways mounting of the screen and buttons).
Parts/Tools needed
- 52mm gauge pod
- SH1102 1.3“ OLED screen (4-wire I2C connection)
- 3x 15mm momentary push buttons (12mm body diameter)
- 1x male DB9 serial terminal
- 1.5mm plastic sheet
- Putty/filler
- Spray paint
- Drill
- Craft knife/Stanley blade
- Soldering iron
- File/sandpaper
Images
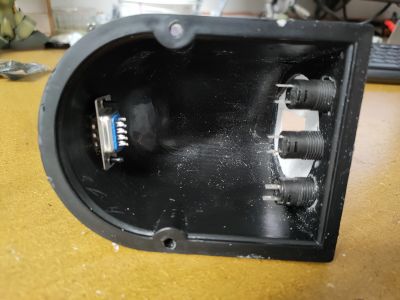
Mounting spots for the OLED module and buttons in place:
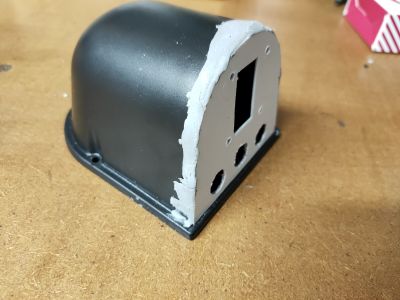
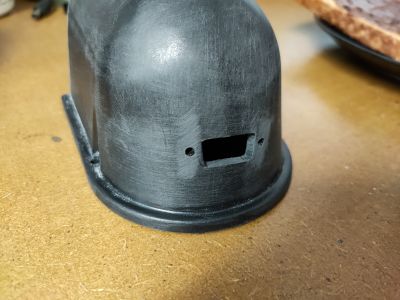
Resin filler applied around the edge of the plastic fascia and then sanded to shape to get rid of any seam lines where the original pod front was covered up:
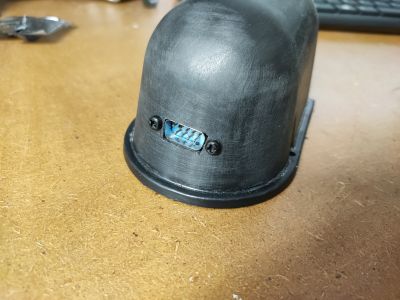
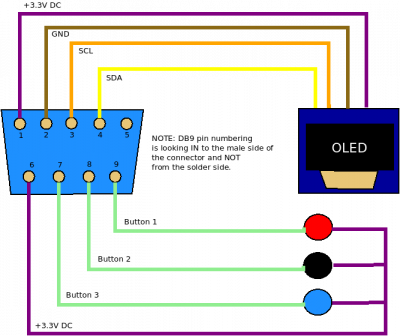
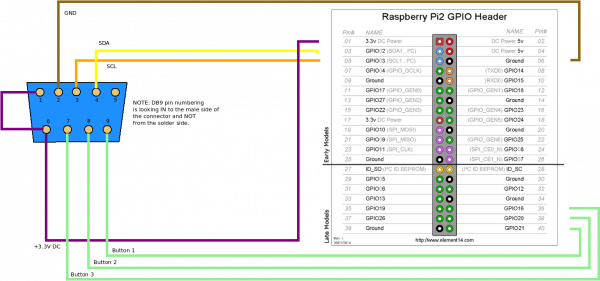
The wiring is fully contained within a 9-pin serial connector which is mounted on the rear of the pod (4 wires for the screen I2C interface, plus 4 for the buttons [1 each for the 3 buttons, plus 1 common voltage input to the Pi's 3.3v output]). This means the pod can be connected back to the Pi anywhere in the car using just a standard 9-pin serial cable.
Painted and with buttons and screen fitted:
Connections
Connections at the pod end of the cable are as follows:
Connections at the Pi end of the cable are as follows:
The serial cable connecting the two ports should be straight through, with all 9 pins connected. These are often labelled as serial extension cables. Conversely null modem cables have several pairs wired oppositely, you do not want one of those.
If using a Super Watchdog V2 hat (which also uses I2C), then take into account the differences to the SCL and SDA connections as mentioned above.
Prototyping & Testing OLED User Interface on a PC
Most OLED display modules interface with a Raspberry Pi or similar using either the I2C or SPI interfaces.
Normally these are not user-accessible on a laptop or desktop PC, but there is a way to add them, and use them for prototyping your OLED based user interfaces without having to resort to running a development environment entirely on a Raspberry Pi.
A very small, very cheap development board has had software ported to it that makes it function as an I2C interface, so all of the prototyping that you would normally have done on a Pi itself can now be done on a PC or laptop.
Parts/Tools
- 4x Dupont connectors/jumper cables/header cables
Connections
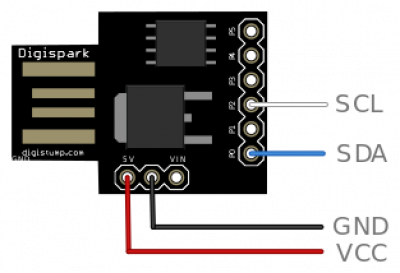
The Digispark board, when flashed with the i2c-tiny-usb firmware, gives you the standard 4 pins needed for an I2C connection:
The connections from these pins to your standard 4-pin OLED display module are the same as if you were connecting to a Pi.
Software Configuration
First, you need to install the software needed to flash the i2c-tiny-usb firmware to the Digispark board. This uses the Arduino IDE and supporting toolset, which is documented for the Digispark board here: http://digistump.com/wiki/digispark/tutorials/connecting
Ultimately, you only need the micronucleus tools installing, then download and flash the firmware from the i2c-tiny-usb project. Once that is complete, plug the Digispark back into your PC and it should be detected as an I2C interface, and can be queried with i2cdetect just as the tools works on a Pi.
On my Linux desktop, the Digispark board appears as I2C bus #08 when plugged in:
i2cdetect 8
WARNING! This program can confuse your I2C bus, cause data loss and worse!
I will probe file /dev/i2c-8.
I will probe address range 0x03-0x77.
Continue? [Y/n] y
     0  1  2  3  4  5  6  7  8  9  a  b  c  d  e  f
00:          -- -- -- -- -- -- -- -- -- -- -- -- --
10: -- -- -- -- -- -- -- -- -- -- -- -- -- -- -- --
20: -- -- -- -- -- -- -- -- -- -- -- -- -- -- -- --
30: -- -- -- -- -- -- -- -- -- -- -- -- -- -- -- --
40: -- -- -- -- -- -- -- -- -- -- -- -- -- -- -- --
50: -- -- -- -- -- -- -- -- -- -- -- -- -- -- -- --
60: -- -- -- -- -- -- -- -- -- -- -- -- -- -- -- --
70: -- -- -- -- -- -- -- --
If you plug your OLED module in to the Digisparks pin connectors, as detailed above, it should show up in the output of i2cdetect.
Remember to change your PyCosworth libs/settings.py configuration to set the correct i2c bus and device number, just as you would do on a Pi:
GFX_MASTER_WINDOW = {
	'windowName'		: 'Master',
	'oledType'		: 'sh1106',		# Replace this with the model number of your OLED module
	'width'			: GFX_MASTER_SIZE[0],
	'height'		: GFX_MASTER_SIZE[1],
	'spiAddress'		: 0,
	'value_refreshTime'	: 0.05,
	'sdl_framebuffer'	: None,
	'luma_framebuffer'	: None,
	'luma_driver'		: None,
	'screen_refreshTime'	: 0.02,
	'i2cPort'		: 8,		# Replace this with the I2C bus you are connecting to. This is when I plug it into the Digispark on my desktop PC
	'i2cAddress'		: 0x3c,		# Replace this with the device ID of your OLED module as returned by i2cdetect
	'mode'			: [GFX_MODE_NUMERIC],
	'currentModeIdx'	: 0,
	'currentMode'		: GFX_MODE_NUMERIC,
	'sensorIds'		: ['AFR', 'AMAL', 'BAT', 'CO', 'ECT', 'IAT', 'IGNADV', 'INJDUR', 'MAP', 'RPM', 'TPS'],
	'currentSensorIdx'	: 0,
	'screen_cycleTime'	: 5,
	'value_refreshTime'	: 0.1,
	'screen_refreshTime'	: 0.05,
}
That's it. All I2C comms (including the graphics routines used by Luma.oled and in turn by PyCosworth) will work unmodified and you can run your OLED display from your PC:
