Sharp X68000 C Code Examples
Here are some example code listings to compile and run on the Sharp X68000. They demonstrate how to use some of the built-in system calls.
All of the samples on this page will compile and run with the Lydux GCC 4.6.2 toolchain.
Remember, the Sharp X68000 is a big-endian machine using the Motorola 68000 or 68030, so all integers in memory are in reverse byte order compared to Intel/AMD x86 and x86_64!
Disk / File / DOS Operations
OS Version Number
This is a simple one which shows the use of a Sharp X68000 system call using the doscalls functions (specifically _dos_vernum). It retrieves the 32bit value stored in memory which represents the OS version string, splits it into its component parts (the 2 upper-most bytes represent two ASCII characters and should always be equal to '6' and '8', i.e. Human68K). The two lower bytes are the major and minor version numbers (i.e. 2 and 1 would be v2.01, 1 and 11 would be v1.11).
Note that doscalls functions are prefixed with _dos in the library built for GCC 4.6.2.
#include <stdio.h>
#include <dos.h>

int main(){
	unsigned int ver;			/* version is stored as a 32bit word */
	unsigned char ver_minor, ver_major;	/* major and minor numbers, e.g. 2.01 */
	char ver_chara, ver_charb;		/* chara == '6', charb == '8' */

	/* Retrieve the 32bit int representing the OS version number */
	ver = _dos_vernum();

	/* mask out the relevant parts of the version number */
	ver_minor = (ver & 0x000000FF);
	ver_major = (ver & 0x0000FF00) >> 8;
	ver_charb = (ver & 0x00FF0000) >> 16;
	ver_chara = (ver & 0xFF000000) >> 24;

	printf("Human68k version: %c%c v%d.%02d\n", ver_chara, ver_charb, ver_major, ver_minor);
	return 0;
}
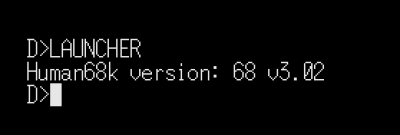
Output should look like:
Finding files or folders
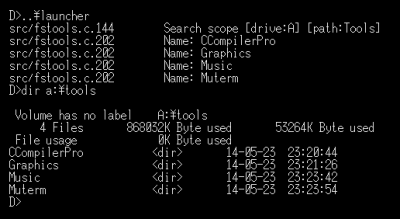
Here's a longer example, demonstrating the use of several drive/directory related functions to get a list of all the sub-directories found within a given drive and path. In the case below it's running from D:\ and searching for any directories under A:\Tools….
The code demonstrates the following system calls:
- _dos_curdrv()
- _dos_curdir()
- _dos_chdgrv()
- _dos_chdir()
- _dos_files()
- _dos_nfiles()
#include <stdio.h>
#include <string.h>
#include <dos.h>
#include "newlib_fixes.h"   // This includes some patches for bugs in files.S and nfiles.S

#define DIR_BUFFER_SIZE 65
#define MAX_DRIVES 26
#define DRIVE_LETTERS {'A', 'B', 'C', 'D', 'E', 'F', 'G', 'H', 'I', 'J', 'K', 'L', 'M', 'N', 'O', 'P', 'Q', 'R', 'S', 'T', 'U', 'V', 'W', 'X', 'Y', 'Z' }

char drvNumToLetter(int drive_number){
	/* Turn a drive number into a drive letter */

	static char mapper[MAX_DRIVES] = DRIVE_LETTERS;

	if (drive_number > MAX_DRIVES){
		return '\0';
	} else {
		return mapper[drive_number];
	}
}

int drvLetterToNum(char drive_letter){
	/* Turn a drive letter into a drive number */

	int c;
	static char mapper[MAX_DRIVES] = DRIVE_LETTERS;

	/* Find the matching position of the drive letter */
	for (c = 0; c < (MAX_DRIVES +1); c++){
		if (mapper[c] == drive_letter){
			return c;
		}
	}
	return -1;
}

char drvLetterFromPath(char *path){
	/* Return the drive letter part of a path like A:\Games */

	/* Must be at least A:\? */
	if (strlen(path) > 3){
		/* Is it a fully qualified path, where the second character is a : */
		if (strncmp(path + 1, ":", 1) == 0){
			/* Return the 'A' part */
			return path[0];
		} else {
			printf("%s.%d\t Doesn't have a drive letter seperator\n", __FILE__, __LINE__);
			return '\0';
		}
	} else {
		printf("%s.%d\t Seems like a short path\n", __FILE__, __LINE__);
		return '\0';
	}
}

int dirFromPath(char *path, char *buffer){
	/* Return the directory part of a path like A:\Games\Folder1 */

	int sz;

	/* Must be at least A:\? */
	if (strlen(path) > 3){
		/* is this a fully qualified path, like a:\games */
		if (strncmp(path + 1, ":", 1) == 0){
			/* size of the string */
			sz = strlen(path);
			if (strncmp(path + sz, "\\", 1) == 0){
				/* copy from the character after the first \ to the last \ */
				strncpy(buffer, path + 3, (sz - 4));
				return 0;
			} else {
				/* copy from the character after the first \ to the last character */
				strncpy(buffer, path + 3, (sz - 3));
				return 0;
			}
		} else {
			return -1;
		}
	} else {
		return -1;
	}
}

int isDir(char *path){
	/* Boolean test to check if a path is a directory or not */
	char dir;
	int dir_type;

	dir = _dos_open(path, 0);
	if (dir == _DOSE_ISDIR){
		dir_type = 1;
	} else {
		dir_type = 0;
	}
	_dos_close(dir);
	return dir_type;
}

int findDirs(char *path){
	/* Open a search path and return any directories found */

	char drive, old_drive;
	char drive_letter, old_drive_letter;
	char status;
	int go;

	/* store directory names */
	char old_dir_buffer[DIR_BUFFER_SIZE];
	char new_dir_buffer[DIR_BUFFER_SIZE];

	/* hold information about a currently open file */
	struct dos_filbuf buffer;

	/* hold information about search path */
	char search_drive;
	char search_dirname[DIR_BUFFER_SIZE];

	/* initialise the directory buffer */
	memset(old_dir_buffer, '\0', sizeof(old_dir_buffer));
	memset(new_dir_buffer, '\0', sizeof(new_dir_buffer));
	memset(search_dirname, '\0', sizeof(search_dirname));

	/* split drive and dirname from search path */
	go = 1;
	search_drive = drvLetterFromPath(path);
	dirFromPath(path, search_dirname);
	printf("%s.%d\t Search scope [drive:%c] [path:%s]\n", __FILE__, __LINE__, search_drive, search_dirname);

	/* save curdrive */
	old_drive = _dos_curdrv();
	old_drive_letter = drvNumToLetter(old_drive);
	if (old_drive < 0){
		printf("%s.%d\t Unable to save current drive [status:%d]\n", __FILE__, __LINE__, old_drive);
		return 0;
	}

	/* save curdir */
	status = _dos_curdir((old_drive + 1), old_dir_buffer);
	if (status < 0){
		printf("%s.%d\t Unable to save current directory [status:%d]\n", __FILE__, __LINE__, status);
		return 0;
	}

	if (isDir(path)){
		/* change to search drive */
		status = _dos_chgdrv(drvLetterToNum(search_drive));
		if (status < old_drive){
			printf("%s.%d\t Unable to change to search drive [status:%d]\n", __FILE__, __LINE__, status);
		} else {

			/* change to search path root */
			status = _dos_chdir("\\");
			if (status != 0){
				printf("%s.%d\t Unable to change to search path root [status:%d]\n", __FILE__, __LINE__, status);
			} else {

				/* change to actual search path */
				status = (_dos_chdir(search_dirname));
				if (status != 0){
					printf("%s.%d\t Unable to change to search path [status:%d][path:%s]\n", __FILE__, __LINE__, status, search_dirname);
				} else {

					/* list files with attribute 0x10 == directory and wildcard name. */
					status = _dos_files(&buffer, "*.*", 0x10);
					if (status >= 0){
						/* Filter out 'special' names */
						if (strcmp(buffer.name, ".") == 0){
							/* we don't want . */
						} else if (strcmp(buffer.name, "..") == 0){
							/* we don't want .. */
						} else {
							printf("%s.%d\t Name: %s\n", __FILE__, __LINE__, buffer.name);
						}
						/* while there exists some matches from the search.... */
						while (go == 1){
							/* read next match */
							status = _dos_nfiles(&buffer);
							if (status == 0){
								go = 1;
								if (strcmp(buffer.name, ".") == 0){
									/* we don't want . */
								} else if (strcmp(buffer.name, "..") == 0){
									/* we don't want .. */
								} else {
									printf("%s.%d\t Name: %s\n", __FILE__, __LINE__, buffer.name);
								}
							} else {
								go = 0;
							}
						}
					} else {
						printf("%s.%d\t Search for files returned no entries [status:%d]\n", __FILE__, __LINE__, status);
					}
				}
			}
		}
	} else {
		printf("%s.%d\t Not a directory\n", __FILE__, __LINE__);
	}

	/* reload current drive and directory */
	status = _dos_chgdrv(old_drive);
	if (status < old_drive){
		printf("%s.%d\t Unable to restore drive [status:%d]\n", __FILE__, __LINE__, status);
		return 0;
	}
	strcpy(new_dir_buffer, "\\");
	strcat(new_dir_buffer, old_dir_buffer);
	status = _dos_chdir(new_dir_buffer);
	if (status != 0){
		printf("%s.%d\t Unable to restore directory [status:%d\n", __FILE__, __LINE__, status);
		return 0;
	}
	return 0;
}

int main() {
	/* Short test harness for the included functions */

	char *searchPath = "A:\\Tools";
	findDirs(searchPath);
	return 0;
}
You should see output similar the following image:
GVRAM Operations
GVRAM is the main video RAM of the Sharp X68000, other types of graphics RAM (text layer, background planes, sprites) are layered on top, but GVRAM is the simplest of them and essentially acts as the equivalent to a framebuffer. You can draw on it, clear, set colours etc.
It's not suitable for text, or for moving things around at high speed (unlike the sprite and background planes), but it does let you select colour modes anywhere from 16 (4bit) to 65536 (16bit) colours and the act of setting a single pixel to a colour is done with a single 16bit write to memory.
Talking of memory, GVRAM is accessed through a memory mapped region of the X68000 address space.
Specifically, depending on the screen mode (resolution and colour depth) chosen, you have from 1 to 4 video pages that can be cycled through at any time; each page with its own unique contents.
In 512×512 (or 256×256) screen modes, the follow video pages (and address ranges) are accessible:
| Page | Address Range | Bytes per X resolution | Available in colour mode |
|---|---|---|---|
| 0 | 0xC00000 - 0xC7FFFF | 1024 (512 x 16bit words) | 4bit (16 colour), 8bit (256 colour), 16bit (65536 colour) |
| 1 | 0xC80000 - 0xCFFFFF | 1024 (512 x 16bit words) | 4bit (16 colour), 8bit (256 colour) |
| 2 | 0xD00000 - 0xD7FFFF | 1024 (512 x 16bit words) | 4bit (16 colour) |
| 3 | 0xD80000 - 0xDFFFFF | 1024 (512 x 16bit words) | 4bit (16 colour) |
You can see that if you set a screen resolution of 256×256, you still actually get a virtual resolution of 512×512, so you could potentially use the off-screen area for holding assets that are scrolled in, or copied in as-needed.
In addition, there is another screen mode, 1024×1024, in which all four video pages are combined:
| Page | Address Range | Bytes per X resolution | Available in colour mode |
|---|---|---|---|
| 0 | 0xC00000 - 0xDFFFFF | 2048 (1024 x 16bit words) | 4bit (16 colour) |
At all times, setting a pixel to a particular colour requires writing a 16bit unsigned integer to a single GVRAM address:
- In 16bit mode, the entire value of a uint16_t integer is used to set a single pixel.
- In 8 bit mode, only the lower 8 bits of a uint16_t integer is used.
- In 4bit mode, only the lower 4 bits of a uint16_t is used.
Remember that all pixel data values are big-endian numbers!
Converting RGB values to X68000 GRB+i
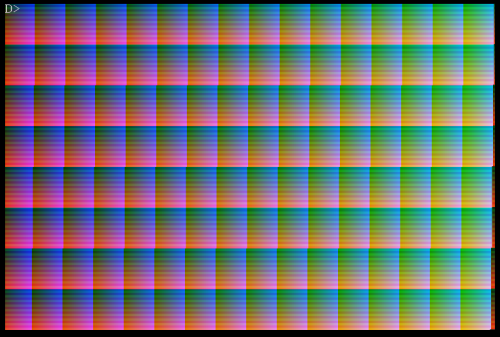
The Sharp X68000 uses a slightly weird colour scheme in 16bit mode.
It uses 5 bits each for the red, green and blue data… 15bits of colour data in total. With an extra 1bit for 'intensity', which basically makes all of those 15bits of colour data darker or lighter - you don't get to pick which those extra colours are; they're just brighter or darker versions of those combinations you've already got.
Most systems store and process data in the order of Red, Green, Blue. Either as seperate bytes in the case of 24bit RGB, or as those 5 bits of colour precision in the case of 16bit. The X68000 doesn't… it flips the Red and Green data, so it's ordered as:
- Green (5 bits)
- Red (5 bits)
- Blue (5 bits)
- Intensity (1 bit)
I use the following macros to convert 3x byte values into a combined 16bit GRB+i colour:
// Macro taken from https://sourceforge.net/projects/x68000-doom/
// Merge 3x 8bit values to 15bit + intensity in GRB format
// Keep only the 5 msb of each value
#define rgb888_2grb(r, g, b, i) ( ((b&0xF8)>>2) | ((g&0xF8)<<8) | ((r&0xF8)<<3) | i )

// Merge 3x 8bit values to 15bit + intensity in RGB format
// Keep only the 5 msb of each value
#define rgb888_2rgb(r, g, b, i) ( ((r&0xF8)<<8) | ((g&0xF8)<<3) | ((b&0xF8)>>2) | i )
You use it as follows:
uint8_t red, green, blue;
uint16_t grbi;

// A nice shade of pink!
red = 168;
green = 69;
blue = 186;

grbi = rgb888_2grb(red, green, blue, 1); // A slightly brighter version
grbi = rgb888_2grb(red, green, blue, 0); // A slightly darker version
The resulting grbi colour value can then be used in any of the functions requiring a X68000 specific colour. If you instead just want a normal 16bit colour value in traditional rgb format, there's the rgb888_2rgb() macro instead.
Changing Screen Mode
Most graphics hardware operations are performed through system calls access via the iocs functions. With the Lydux GCC toolchain these are listed in the file: /opt/toolchains/x68k/human68k/include/iocs.h - if you are on Windows, or have compiled up the toolchain yourself from source, the location will of course be different.
These tiny wrappers map the X68000 BIOS/ROM calls to C functions. Things like: clear graphics screen, set video mode, scroll screen region etc.
The process to set and change to a new screen mode is refreshingly simple on the X68000 compared to a lot of other machines (the x86 and DOS!).
The process is:
- (optionally) Save current screen mode setting
- Set the new screen mode
- Set at least one graphics page to be active
- (optionally) clear the graphics page
- (optionally) turn text cursor off
To return to the previous screen mode is basically the same in reverse.
#include <stdio.h>
#include <iocs.h>

int main() {

	unsigned int lastmode;

	/* Record current mode */
	lastmode = _iocs_crtmod(-1);

	/* Initialise new screen mode - see
	    CRTMOD mode list*/
	_iocs_crtmod(8);

	/* Select which graphic page is active
	    some modes have more than one
	    page (e.g. double buffering) see
	    CRTMOD mode list */
	_iocs_vpage(0);

	/* Clear screen contents */
	_iocs_g_clr_on();
	/* Turn text cursor off */
	_iocs_b_curoff();

	/* The magic of doing stuff with the screen happens here */

	/* ..... */

	/* Restore original screen mode */
	_iocs_crtmod(lastmode);
	/* Enable text cursor */
	_iocs_b_curon();

	return 0;
}
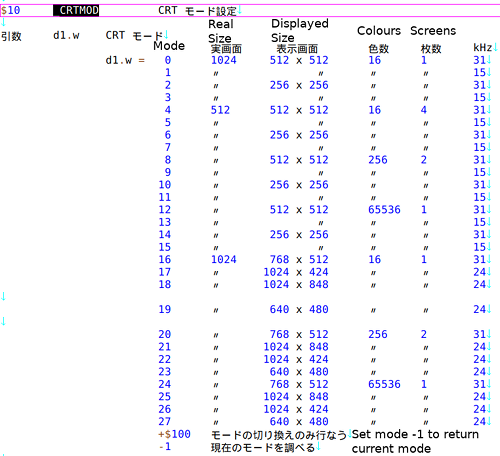
The full list of available screen modes for the X68000 is described in the PUNI docs in the iocscall.rtf document under the definition of crtmod:
… you can see that
_iocs_crtmod(8);
sets the screen to be 512 x 512 in 256 colour and provides two such screens (double buffering?). You can even have mode 12; a 16bit screen on 512 x 512 in 65536 colour, that's a pretty spectacular screen mode for a machine dating from 1987!
It does have some really nice screen modes, down towards the bottom of the list, but you should be aware that these are only supported in machines which have a later BIOS/ROM (or IPL in X68000 speak), so you cannot rely on them being available on all machines.
Specifically, (according to the PUNI documentation - and Inside X68000 manual) mode 19 (640×480) is only available on X68000 models with ROM IOCS 1.2 or higher, and modes 20-27 are only available on machines with ROM IOCS 1.3 or higher… I can't tell you which models (Ace, Super, Expert, Pro, XVI, Compact, 030) that means as I don't know. Best stick with screen modes under mode 19.
XY Screen coordinates to GVRAM address
The GVRAM on the Sharp X68000 is arranged in such a way that the starting address of a given video page is always the top left corner of the screen (usually x=0, y=0). With the last address of a given video page being the bottom right corner (x=511, y=511 on a 512×512 resolution video mode).
With this in mind, and the fact that every pixel on a X68000 GVRAM video screen taking exactly 2 bytes, we can plot xy coordinates to specific GVRAM addresses quite easily (and we'll need to do so in order to accurately place elements on the screen).
#define GVRAM_START	0xC00000	// Start of graphics vram for this video page
#define GVRAM_END	0xC7FFFF	// End of graphics vram for this video page

int gvramGetXYaddr(int x, int y){
	// Return the memory address of an X,Y screen coordinate based on the GFX_COLS and GFX_ROWS
	// as defined in gfx.h - if you define a different screen mode dynamically, this WILL NOT WORK

	uint32_t addr;
	uint16_t row;

	// This could be a one liner, but without hardware multiplication, perhaps
	// its better to stick to an addition loop?
	addr = GVRAM_START;

	for(row = 0; row < y; row++){   // We are really doing GFX_ROW_SIZE * y
		addr += GFX_ROW_SIZE;
	}
	addr += (x * GFX_PIXEL_SIZE);

	if (GFX_VERBOSE){
		printf("%s.%d\t x:%03d y:%03d gvram:%08x\n", __FILE__, __LINE__, x, y, (unsigned int) addr);
	}

	if (addr>GVRAM_END){
		if (GFX_VERBOSE){
			printf("%s.%d\t XY coords beyond GVRAM address range\n", __FILE__, __LINE__);
		}
	}
	return addr;
}
This will return an address that can be used to reassign the current GVRAM pointer (uint16_t *gvram;) to the coordinates which have been specified.
Note:
- It needs profiling whether GFX_COLS * y is faster or slower than multiple additions of GFX_COLS. On a FPU-less microprocessor like the 68000, it could be the latter. I'm not sure yet.
Filling the screen with pixels in GVRAM
The following function will draw a black and white checkerboard pattern in GVRAM by setting alternating pixels in each row to be either 0xFFFF (white) or 0x0000 (black).
#include <dos.h>
#include <iocs.h>
#include <stdio.h>
#include <stdint.h>

#define CRT_MODE 		8			// 512x512 65535 colour
#define GFX_ROWS		512
#define GFX_COLS		512
#define GVRAM_START		0xC00000	// Start of graphics vram
#define RGB_BLACK		0x0000		// Simple RGB definition for a black 16bit pixel
#define RGB_WHITE		0xFFFF		// Simple RGB definition for a white 16bit pixel

volatile uint16_t	*gvram;

int gfx_init(int verbose){

	_iocs_crtmod(CRT_MODE);
	_iocs_vpage(0);
	_iocs_g_clr_on();

	return 0;
}

void gfx_checkerboard(){
	int x;
	int y;
	int bit;
	uint16_t super;
	bit = 1;

	super = _dos_super(0);

	gvram = GVRAM_START;

	for(y = 0; y < GFX_ROWS; y++){
		for(x = 0; x < GFX_COLS; x++){
			if (bit){
				*gvram = RGB_WHITE;
			} else {
				*gvram = RGB_BLACK;
			}
			bit = 1 - bit;
			// Step to next pixel address
			gvram++;
		}
		bit = 1 - bit;
	}
	_dos_super(super);
}
The output from the code should be as follows:
Notes:
- To access memory directly you need to be in 68k supervisor mode (_dos_super())
- GVRAM always represents a single pixel with a single 16bit value (uint16_t).
- GVRAM is represented by a single, linear address space.
- GVRAM can use multiple drawing pages in 16 or 256 colour mode that can be switched between (rendering in advance, a status screen, double-buffering, etc).
- GVRAM has only a single drawing page in 65535 colour mode.
- For your modified pixels to be visible, you need to set the given drawing page to be active (_iocs_vpage()).
Drawing a 65535 Colour Gradient in GVRAM
Here's how I've figured out how to draw pixels in 16bit colour mode:
#define CRT_MODE 		12	// 512x512 65535 colour
#define GFX_ROWS		512
#define GFX_COLS		512
#define GVRAM_START	0xC00000	// Start of graphics vram
volatile uint16_t	*gvram;		// Pointer to a GVRAM location

/* Macro taken from https://sourceforge.net/projects/x68000-doom/ */
/* Merge 3 8bit values to 15bit + intensity in GRB format */
/* Keep only the 5 msb of each value */
#define rgb2grb(r, g, b, i) ( ((b&0xF8)>>2) | ((g&0xF8)<<8) | ((r&0xF8)<<3) | i )

int gfx_init(int verbose){

	_iocs_crtmod(CRT_MODE);
	_iocs_vpage(0);
	_iocs_g_clr_on();

	return 0;
}

void gfx_rainbow(){
	int x, y;
	uint16_t super;
	uint8_t r,g,b, i_high, i_low;
	unsigned r_mask, g_mask, b_mask;
	uint16_t i, ii;
	super = _dos_super(0);

	// Construct masks needed to extract 5 bits each of red, green and blue from a 16bit int
	r_mask = ((1 << 5) - 1) << 10;
	g_mask = ((1 << 5) - 1) << 5;
	b_mask = ((1 << 5) - 1) << 0;
	r=g=b=0;
	i=0;
	ii=0;
	gvram = GVRAM_START;

	for(y = 0; y < GFX_ROWS; y++){
		for(x = 0; x < GFX_COLS; x++){
			i++; 	// Counter which generates our colour
			if (i >= 65535){
				i = 0;
			}
			// Shift each byte left 3, we only combine the 5 msb for the 15bit+intensity value
			r = (uint8_t)  (((i & r_mask) >> 10) << 3);
			g = (uint8_t) (((i & g_mask) >> 5) << 3);
			b = (uint8_t) (((i & b_mask) >> 0) << 3);
			// Convert r,g,b values to x68000 grbi
			ii = rgb2grb(r,g,b,1);

			// Write single 16bit word in grb
			*gvram = ii;

			// If writing in 16bit word mode, step by +1
			gvram+=1;
		}
	}
	_dos_super(super);
}
The output should produce a 64k colour gradient in GVRAM as below:
Some points to note:
- Writes to individual pixels in GVRAM are a single 16bit word, in GRBI format
- Green, red and blue each have 5 bits of precision for a 15bit colour space
- I is intensity, a single bit which represents brightness of the colour, giving an effective 16bit colour space
A simple linear gradient in GVRAM
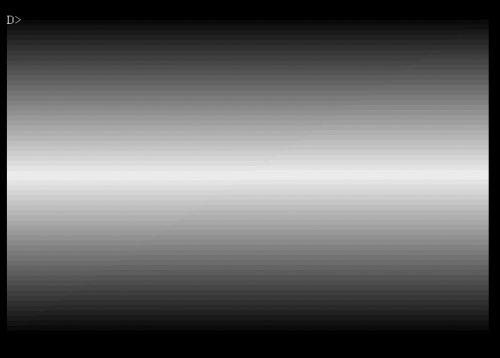
Here's a tiny bit of code to draw a simple greyscale gradient; note that once it reached the middle position of the screen (GFX_ROWS and the y parameter) it reverses.
Calls/important variables used:
- _dos_super(0); To enable supervisor mode and allow direct access to memory
- _iocs_crtmod(12); To set 512×512 in 16bit video mode
- _iocs_vpage(0); To select GVRAM page 0 as active
- _iocs_g_clr_on(); To do an initial clear of the screen
- rgb2grb(r,g,b,1); To convert 3x 8bit colour values into a 15bit+intensity value
- *gvram A 16bit (uint16_t) pointer to the current address in GVRAM representing the current pixel
- GVRAM_START A 16bit (uint16_t) number specifying the start address of GVRAM (i.e. coordinate 0,0 on the screen)
- GVRAM_END A 16bit (uint16_t) number specifying the end address of GVRAM (i.e. coordinate 511,511 on the screen)
It should be pretty simple to convert this to a colour version by changing the initial values for rgb:
#define CRT_MODE 		12	// 512x512 65535 colour
#define GFX_ROWS		512
#define GFX_COLS		512
#define GVRAM_START	0xC00000	// Start of graphics vram
volatile uint16_t	*gvram;		// Pointer to a GVRAM location

/* Macro taken from https://sourceforge.net/projects/x68000-doom/ */
/* Merge 3 8bit values to 15bit + intensity in GRB format */
/* Keep only the 5 msb of each value */
#define rgb2grb(r, g, b, i) ( ((b&0xF8)>>2) | ((g&0xF8)<<8) | ((r&0xF8)<<3) | i )

void gfx_gradient(){
	int x, row;
	int y, col;
	uint16_t super;
	uint8_t r,g,b;
	super = _dos_super(0);
	r=g=b=0x00;
	x = 0;
	y = 0;
	for(gvram = GVRAM_START; gvram < GVRAM_END; gvram++){
		x++;
		if (y < 255){
			if (x >= 511){
				// Next line, before row 256
				y++;
				x = 0;
				if (r >= 255){
					r = g = b = 256;
				} else {
					r++;
					g++;
					b++;
				}
			}
		} else {
			if (x >= 511){
				// Next line, after row 256
				y++;
				x = 0;
				if (r == 0){
					r = g = b = 0;
				} else {
					r--;
					g--;
					b--;
				}
			}
		}
		*gvram = rgb2grb(r,g,b,1);
	}
	_dos_super(super);
}
Output should look like this:
Loading 16bit RGB Bitmap from Disk
Here's a useful function to load a Windows BMP file, stored as 2-byte RGB (R:5, G:6, B:5), convert it to big-endian as suitable for the Motorola 68000 and change the colourspace from RGB565 to GRB555 as used by the X68000.
Note:
- Compressed BMP files are not supported
- Only 16bit colour depth files (paletted images and 24bit RGB are not supported in this implementation)
- Negative height files (stored inverse to the normal BMP layout) are not supported
- BMP files with alpha channels are not supported.
First, here's the header, which includes some definitions for the BMP data structure we're going to use:
/*
 bmp.h - C prototypes for the simple Windows BMP file loader
 based on the example at:
 https://elcharolin.wordpress.com/2018/11/28/read-and-write-bmp-files-in-c-c/

 Modified for use on M68000 powered Sharp X68000 by John Snowdon (2020).

*/

#include <stdint.h>

#define BMP_FILE_SIG_OFFSET		0x0000 // Should always be 'BM'
#define BMP_FILE_SIZE_OFFSET		0x0002 // Size of file, including headers
#define DATA_OFFSET_OFFSET 		0x000A // How many bytes from 0x0000 the data section starts
#define WIDTH_OFFSET 			0x0012 // Where we can find the x-axis pixel size
#define HEIGHT_OFFSET 			0x0016 // Where we can find the y-axis pixel size
#define BITS_PER_PIXEL_OFFSET	0x001C // Where we can find the bits-per-pixel number
#define COMPRESS_OFFSET		0x001E // Where we can find the compression flag
#define COLOUR_NUM_OFFSET		0x002E // Where we can find the numbers of colours used in the image
#define COLOUR_PRI_OFFSET		0x0032 // Where we can find the number of the 'important' colour ???
#define PALETTE_OFFSET			0x0036 // Where the colour palette starts, for <=8bpp images.
#define HEADER_SIZE 				14
#define INFO_HEADER_SIZE 		40
#define BMP_8BPP				8
#define BMP_16BPP				16
#define BMP_UNCOMPRESSED		0
#define BMP_VERBOSE			0 // Enable BMP specific debug/verbose output
#define BMP_OK					0 // BMP loaded and decode okay
#define BMP_ERR_NOFILE			-1 // Cannot find file
#define BMP_ERR_SIZE			-2 // Height/Width outside bounds
#define BMP_ERR_MEM			-3 // Unable to allocate memory
#define BMP_ERR_BPP				-4 // Unsupported colour depth/BPP
#define BMP_ERR_READ			-5 // Error reading or seeking within file
#define BMP_ERR_COMPRESSED	-6 // We dont support comrpessed BMP files

typedef struct bmpdata {
	unsigned int 	width;			// X resolution in pixels
	unsigned int 	height;			// Y resolution in pixels
	char		compressed;		// If the data is compressed or not (usually RLE)
	uint16_t 	bpp;			// Bits per pixel
	uint16_t 	bytespp;		// Bytes per pixel
	uint32_t 	offset;			// Offset from header to data section, in bytes
	unsigned int 	row_padded;		// Size of a row without padding
	unsigned int 	row_unpadded;	        // SIze of a row, padded to a multiple of 4 bytes
	unsigned int 	size;			// Size of the pixel data, in bytes
	unsigned int	n_pixels;			// Number of pixels
	uint8_t 	*pixels;			// Pointer to raw pixels
} __attribute__((__packed__)) __attribute__((aligned (2))) bmpdata_t;

int bmp_ReadImage(FILE *bmp_image, bmpdata_t *bmpdata, uint8_t header, uint8_t data);
int bmp_ReadImageHeader(FILE *bmp_image, bmpdata_t *bmpdata);
int bmp_ReadImageData(FILE *bmp_image, bmpdata_t *bmpdata);
Second, here's the actual logic which does the reading from disk, interrogates the BMP header data:
/*
 bmp.c - a simple Windows BMP file loader
 based on the example at:
 https://elcharolin.wordpress.com/2018/11/28/read-and-write-bmp-files-in-c-c/

 Modified for use on M68000 powered Sharp X68000 by John Snowdon (2020).

*/

#include <stdio.h>
#include <stdlib.h>
#include <stdint.h>
#include <string.h>
#include <math.h>
#include <dos.h>

#include "utils.h"
#include "bmp.h"
#include "rgb.h"

int bmp_ReadImage(FILE *bmp_image, bmpdata_t *bmpdata, uint8_t header, uint8_t data){
	/*
		bmp_image 	== open file handle to your bmp file
		bmpdata 	== a bmpdata_t struct
		header		== 1/0 to enable bmp header parsing
		data			== 1/0 to enable bmp pixel extraction (cannot do this without first parsing the header)

		Example use:

		FILE *f;
		bmpdata_t bmp = NULL;
		bmp = (bmpdata_t *) malloc(sizeof(bmpdata_t));
		bmp->pixels = NULL;

		f = fopen("file.bmp", "rb");
		bmp_ReadImage(f, bmp, 1, 1);
		bmp_Destroy(bmp);
		fclose(f);
	*/

	uint8_t	*bmp_ptr, *bmp_ptr_old;	// Represents which row of pixels we are reading at any time
	int 		i;			// A loop counter
	int		status;		// Generic status for calls from fread/fseek etc.
	uint16_t 	pixel;		// A single pixel

	if (header){
		// Seek to dataoffset position in header
		fseek(bmp_image, 0, 1);
		status = fseek(bmp_image, DATA_OFFSET_OFFSET, SEEK_SET);
		if (status != 0){
			if (BMP_VERBOSE){
				printf("%s.%d\t Error seeking data offset in header\n", __FILE__, __LINE__);
			}
			return BMP_ERR_READ;
		}
		// Read data offset value
		status = fread(&bmpdata->offset, 4, 1, bmp_image);
		if (status < 1){
			if (BMP_VERBOSE){
				printf("%s.%d\t Error reading %d records at data offset header pos, got %d\n", __FILE__, __LINE__, 4, status);
			}
			return BMP_ERR_READ;
		}
		// offset is a little-endian 32bit, so swap it
		bmpdata->offset = swap_int32(bmpdata->offset);

		// Seek to image width/columns position in header
		status = fseek(bmp_image, WIDTH_OFFSET, SEEK_SET);
		if (status != 0){
			if (BMP_VERBOSE){
				printf("%s.%d\t Error seeking width in header\n", __FILE__, __LINE__);
			}
			return BMP_ERR_READ;
		}
		// Read width value
		status = fread(&bmpdata->width, 4, 1, bmp_image);
		if (status < 1){
			if (BMP_VERBOSE){
				printf("%s.%d\t Error reading %d records at image width header pos, got %d\n", __FILE__, __LINE__, 4, status);
			}
			return BMP_ERR_READ;
		}
		// width is a little-endian 32bit, so swap it
		bmpdata->width = swap_int32(bmpdata->width);

		// Seek to image height/rows position in header
		status = fseek(bmp_image, HEIGHT_OFFSET, SEEK_SET);
		if (status != 0){
			if (BMP_VERBOSE){
				printf("%s.%d\t Error seeking height in header\n", __FILE__, __LINE__);
			}
			return BMP_ERR_READ;
		}
		// Read height value
		status = fread(&bmpdata->height, 4, 1, bmp_image);
		if (status < 1){
			if (BMP_VERBOSE){
				printf("%s.%d\t Error reading %d records at image height header pos, got %d\n", __FILE__, __LINE__, 4, status);
			}
			return BMP_ERR_READ;
		}
		// Height is a little-endian 32bit so swap it
		bmpdata->height = swap_int32(bmpdata->height);

		// Seek to bpp location in header
		status = fseek(bmp_image, BITS_PER_PIXEL_OFFSET, SEEK_SET);
		if (status != 0){
			if (BMP_VERBOSE){
				printf("%s.%d\t Error seeking bpp in header\n", __FILE__, __LINE__);
			}
			return BMP_ERR_READ;
		}
		// Read bpp value
		status = fread(&bmpdata->bpp, 2, 1, bmp_image);
		if (status < 1){
			if (BMP_VERBOSE){
				printf("%s.%d\t Error reading %d records at bpp header pos, got %d\n", __FILE__, __LINE__, 2, status);
			}
			return BMP_ERR_READ;
		}
		// BPP is a little-endian 16bit, so swap it
		bmpdata->bpp = swap_int16(bmpdata->bpp);
		if ((bmpdata->bpp != BMP_8BPP) && (bmpdata->bpp != BMP_16BPP)){
			if (BMP_VERBOSE){
				printf("%s.%d\t Unsupported pixel depth of %dbpp\n", __FILE__, __LINE__, bmpdata->bpp);
				printf("%s.%d\t The supported pixel depths are %d and %d\n", __FILE__, __LINE__, BMP_8BPP, BMP_16BPP);
			}
			return BMP_ERR_BPP;
		}

		// Seek to compression field
		status = fseek(bmp_image, COMPRESS_OFFSET, SEEK_SET);
		if (status != 0){
			if (BMP_VERBOSE){
				printf("%s.%d\t Error seeking compression field in header\n", __FILE__, __LINE__);
			}
			return BMP_ERR_READ;
		}
		// Read compression value
		status = fread(&bmpdata->compressed, sizeof(bmpdata->compressed), 1, bmp_image);
		if (status < 1){
			if (BMP_VERBOSE){
				printf("%s.%d\t Error reading %d records at compression type header pos, got %d\n", __FILE__, __LINE__, 4, status);
			}
			return BMP_ERR_READ;
		}

		// compression is a little-endian 32bit so swap it
		bmpdata->compressed = swap_int32(bmpdata->compressed);
		if (bmpdata->compressed != BMP_UNCOMPRESSED){
			if (BMP_VERBOSE){
				printf("%s.%d\t Unsupported compressed BMP format\n", __FILE__, __LINE__);
			}
			return BMP_ERR_COMPRESSED;
		}

		// Calculate the bytes needed to store a single pixel
		bmpdata->bytespp = (uint16_t) (bmpdata->bpp >> 3);

		// Rows are stored bottom-up
		// Each row is padded to be a multiple of 4 bytes.
		// We calculate the padded row size in bytes
		bmpdata->row_padded = (int)(4 * ceil((float)(bmpdata->width) / 4.0f)) * bmpdata->bytespp; // This needs moving from ceil/floating point!!!!

		// We are not interested in the padded bytes, so we allocate memory just for
		// the pixel data
		bmpdata->row_unpadded = bmpdata->width * bmpdata->bytespp;

		bmpdata->size = (bmpdata->width * bmpdata->height * bmpdata->bytespp);

		bmpdata->n_pixels = bmpdata->width * bmpdata->height;

		if (BMP_VERBOSE){
			printf("%s.%d\t Bitmap header loaded ok!\n", __FILE__, __LINE__);
			printf("%s.%d\t Info - Resolution: %dx%d\n", __FILE__, __LINE__, bmpdata->width, bmpdata->height);
			printf("%s.%d\t Info - Padded row size: %d bytes\n", __FILE__, __LINE__, bmpdata->row_padded);
			printf("%s.%d\t Info - Unpadded row size: %d bytes\n", __FILE__, __LINE__, bmpdata->row_unpadded);
			printf("%s.%d\t Info - Colour depth: %dbpp\n", __FILE__, __LINE__, bmpdata->bpp);
			printf("%s.%d\t Info - Storage size: %d bytes\n", __FILE__, __LINE__, bmpdata->size);
			printf("%s.%d\t Info - Pixel data @ %x\n", __FILE__, __LINE__, (unsigned int) &bmpdata->pixels);
		}
	}

	if (data){

		// First verify if we've actually read the header section...
		if (bmpdata->offset <= 0){
			if (BMP_VERBOSE){
				printf("%s.%d\t Data offset not found or null, unable to seek to data section\n", __FILE__, __LINE__);
			}
			return BMP_ERR_READ;
		}

		// Total size of the pixel data in bytes
		bmpdata->pixels = (uint8_t*) calloc(bmpdata->n_pixels, bmpdata->bytespp);
		if (bmpdata->pixels == NULL){
			if (BMP_VERBOSE){
				printf("%s.%d\t Unable to allocate memory for pixel data\n", __FILE__, __LINE__);
			}
			return BMP_ERR_MEM;
		}

		// Set the pixer buffer point to point to the very end of the buffer, minus the space for one row
		// We have to read the BMP data backwards into the buffer, as it is stored in the file bottom to top
		bmp_ptr = bmpdata->pixels + ((bmpdata->height - 1) * bmpdata->row_unpadded);

		// Seek to start of data section in file
		fseek(bmp_image, bmpdata->offset, SEEK_SET);

		// For every row in the image...
		for (i = 0; i < bmpdata->height; i++){

			status = fread(bmp_ptr, 1, bmpdata->row_unpadded, bmp_image);
			if (status < 1){
				if (BMP_VERBOSE){
					printf("%s.%d\t Error reading file at pos %u\n", __FILE__, __LINE__, (unsigned int) ftell(bmp_image));
					printf("%s.%d\t Error reading %d records, got %d\n", __FILE__, __LINE__, bmpdata->row_unpadded, status);
				}
				free(bmpdata->pixels);
				return BMP_ERR_READ;
			}

			// Update pixel buffer position to the next row which we'll read next loop (from bottom to top)
			bmp_ptr -= bmpdata->row_unpadded;

			// Seek to next set of pixels for the next row if row_unpadded < row_padded
			if (status != bmpdata->row_unpadded){
				// Seek the number of bytes left in this row
				status = fseek(bmp_image, (bmpdata->row_padded - status), SEEK_CUR);
				if (status != 0){
					if (BMP_VERBOSE){
						printf("%s.%d\t Error seeking next row of pixels\n", __FILE__, __LINE__);
					}
					free(bmpdata->pixels);
					return BMP_ERR_READ;
				}
			}
			// Else... the fread() already left us at the next row
		}
	}
	return BMP_OK;
}

int bmp_ReadImageHeader(FILE *bmp_image, bmpdata_t *bmpdata){
	// Just read the header information about a BMP image into a bmpdata structure
	return bmp_ReadImage(bmp_image, bmpdata, 1, 0);
}

int bmp_ReadImageData(FILE *bmp_image, bmpdata_t *bmpdata){
	// Just load the pixel data into an already defined bmpdata structure
	return bmp_ReadImage(bmp_image, bmpdata, 0, 1);
}

void bmp_Destroy(bmpdata_t *bmpdata){
	// Destroy a bmpdata structure and free any memory allocated

	if (bmpdata->pixels != NULL){
		free(bmpdata->pixels);
	}
	free(bmpdata);
}
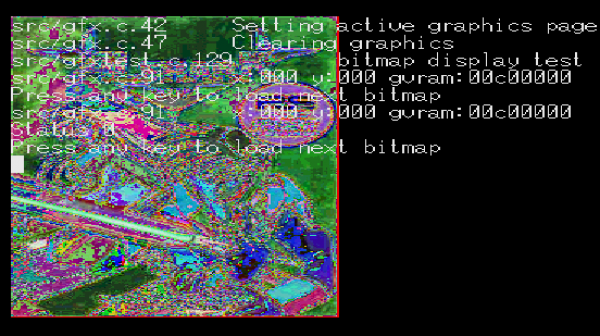
The above code gets us the image data in bmpdata_t→pixels, but we can't do much with them, because if you try to display them (using the bitmap to gvram function below), you'll see something like this:
That shows the image data is still in little-endian format, and the Motorola 68000 as used in the Sharp X68000 expects numbers (and 16bit pixels are just numbers!) in big-endian format.
To do that, we'll need to loop over all the pixels we've read, and swap the bytes of each pixel from position 1 to position 2, and from position 2 to position 1.
The following code will do that:
// Define a macro to swap endianess of a 16bit integer
#define swap_int16(i) ((i << 8) | ((i >> 8) & 0xFF))

// Assuming pixels are stored in an array of bytes pointed to by bmp_ptr
// n_pixels is the number of pixels (not bytes!) in the image (width * height * bytes per pixel)
// bytespp is the number of bytes per pixel

for(i = 0; i < >n_pixels; i++){
        // Remember, each pixel is actually 2 bytes
	pixel = (uint16_t) (((bmp_ptr[0] & 0xFF) << 8) | (bmp_ptr[1] & 0xFF));

	// Swap from the native little-endian BMP data to big-endian
	pixel = swap_int16(pixel);

        bmp_ptr[0] = ((pixel & 0xFF00) >> 8);
	bmp_ptr[1] = ((pixel & 0x00FF));
	bmp_ptr += bytespp;
}
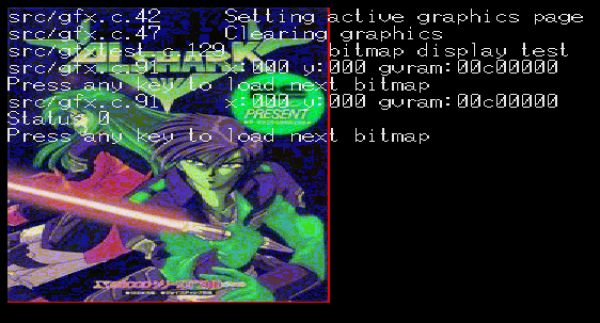
If we add that fragment just at the bottom of the for() loop which reads the data from disk, we'll end up with a big-endian set of pixels in our pixel buffer. However, if you again try to display it as-is, you'll find things have improved somewhat, but it still doesn't look right, for example:
In the above image, everything has a horrible, sickly green tinge. The reason for that is that the Sharp uses a GRB+I pixel format (green, red, blue, intensity; with 5 bits for the former 3, and 1 for the latter), whereas the BMP file (and almost everyone else!) stores data in RGB format (with 5 bits for red, 6 for green and 5 for blue, in the case of BMP files).
Fortunately it's relatively easy to do a simple colourspace conversion (note, that's never going to be a perfect conversion, as we're throwing away 1bit of data for the green channel), as follows:
// Define bitmasks to extract the correct number of bits from a 16bit integer, for each channel
#define r_mask565 ((1 << 5) - 1) << 11  // 5 bits of precision
#define g_mask565 ((1 << 6) - 1) << 5   // 6 bits of precision
#define b_mask565 ((1 << 5) - 1) << 0   // 5 bits of precision

// This nacro taken from https://sourceforge.net/projects/x68000-doom/
// Merge 3x 8bit values to 15bit + intensity in GRB format
// Keep only the 5 msb of each value
#define rgb888_2grb(r, g, b, i) ( ((b&0xF8)>>2) | ((g&0xF8)<<8) | ((r&0xF8)<<3) | i )

// Assuming 'pixel' is our 16bit, byteswapped pixel that we had in the earlier example
r = (((pixel & r_mask565) >> 11) << 3);
g = (((pixel & g_mask565) >> 5) << 2);
b = (((pixel & b_mask565)  >> 0) << 3);
// r,g,b are now 8bit integers with only the top 5 or 6 bits of information

// Pass those 3 8bit integers into a macro
pixel = rgb888_2grb(r, g, b, 1);

// pixel now is a 15bit grb + 1bit intensity value, suitable for copying to the Sharp GVRAM screen.
If we add that to our byteswap loop we wrote above, we should get an array of pixels which are big-endian and now in the Sharps native GRBI format.
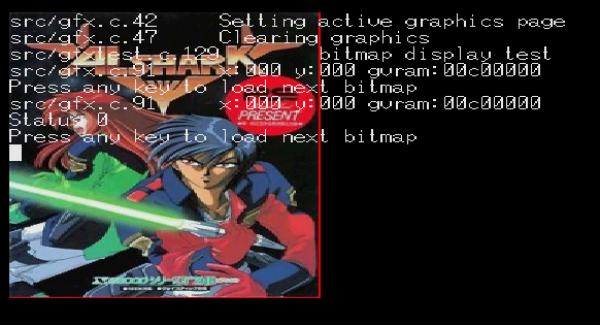
If you do copy this data to the screen now, you should get a correctly formatted and colour-space correct image:
Hurrah! Do you know how much effort that was, with the available documentation to go on??? 
Copying Bitmap data to GVRAM
Once we have data in the required format, it's actually incredibly easy to get it on the screen. The Graphics VRAM address space is one linear region from the first pixel (x=0, y=0, top left origin) to the last (x=511, y=511, bottom right, in the case of a 512×512 screen mode).
int gvramBitmap(int x, int y, bmpdata_t *bmpdata){
	// Load bitmap data into gvram at coords x,y

	int row, col;		//  x and y position counters
	int start_addr;	        // The first vram address
	uint16_t *ptr;          // Pointer to the current position in the pixel buffer
	int width_bytes;	// Number of bytes in one row of the image

	width_bytes = bmpdata->width * bmpdata->bytespp;

	// Get starting pixel address
	start_addr = gvramGetXYaddr(x, y);
	if (start_addr < 0){
		if (GFX_VERBOSE){
			printf("%s.%d\t Unable to set GVRAM start address\n", __FILE__, __LINE__);
		}
		return -1;
	}
	// Set starting pixel address
	gvram = (uint16_t*) start_addr;

	width_bytes = bmpdata->width * bmpdata->bytespp;

	// memcpy entire rows at a time
	ptr = bmpdata->pixels;
	for(row = 0; row < bmpdata->height; row++){
		memcpy(gvram, ptr, width_bytes);

		// Go to next row in vram
		gvram += GFX_COLS;

		// Increment point
		ptr += bmpdata->width;
	}
	return 0;
}
…. and that's it! All you do is memcpy enough 16bit values for each row of your bitmap (remember our graphics data is stored as an array of bytes, so we need two values for each pixel (at least in 16bit colour mode!).
Note:
- The above function does not take into account images which go beyond the screen edges - ideally they should be clipped.
- The above function only works with 16bit pixels… 8bit should be relatively easy to implement, but there is no checking to see whether the bitmap data is in the correct form (use bmpdata_t→bpp or bmpdata_t→bytespp as defined in bmp.h, above)
Drawing a single pixel in GVRAM
This is a variation on other things we've shown above, but it's quite simple; it builds on the XY to GVRAM address function, as well as the RGB888_2GRB macro we define (to give us a uint16_t rgb colour value).
Here it is in its entirety:
int gvramPoint(int x, int y, uint16_t grbi){
	// Draw a single pixel, in a given colour at the point x,y

	// Get starting pixel address
	gvram = (uint16_t*) gvramGetXYaddr(x, y);
	if (gvram < 0){
		if (GFX_VERBOSE){
			printf("%s.%d\t Unable to set GVRAM start address\n", __FILE__, __LINE__);
		}
		return -1;
	}
	*gvram = grbi;
	return 0;
}
If this is called as follows:
red = rgb888_2grb(0xFF, 0x00, 0x00, 1);
gvramPoint(0, 0, red);
gvramPoint(10, 10, red);
gvramPoint(25, 25, red);
gvramPoint(100, 100, red);
gvramPoint(250, 250, red);
gvramPoint(350, 350, red);
gvramPoint(500, 500, red);
gvramPoint(511, 511, red);
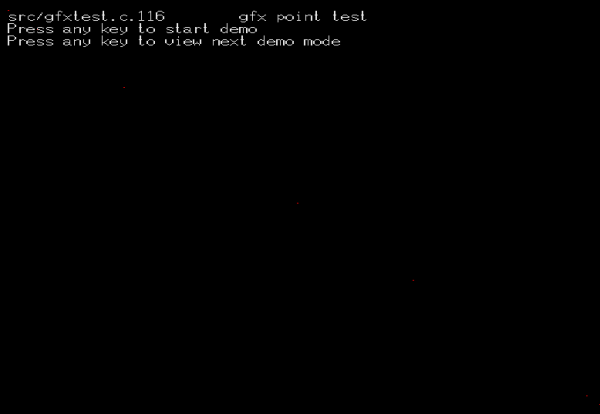
This should generate output of a sequence of 8 red pixels along a diagonal line from 0,0 to 511,511:
You may need to click this image to see the points successfully.
Drawing a rectangle in GVRAM
Another basic function, again using the RGB888_2GRB colour macro, and the XY coordinate function:
int gvramBox(int x1, int y1, int x2, int y2, uint16_t grbi){
	// Draw a box outline with a given grbi colour
	int row, col;		//  x and y position counters
	int start_addr;	// The first pixel, at x1,y1
	int temp;		// Holds either x or y, if we need to flip them
	int step;

	// Flip y, if it is supplied reversed
	if (y1>y2){
		temp=y1;
		y1=y2;
		y2=temp;
	}
	// Flip x, if it is supplied reversed
	if (x1>x2){
		temp=x1;
		x1=x2;
		x2=temp;
	}
	// Clip the x range to the edge of the screen
	if (x2>GFX_COLS){
		x2 = GFX_COLS - 1;
	}
	// Clip the y range to the bottom of the screen
	if (y2>GFX_ROWS){
		y2 = GFX_ROWS - 1;
	}
	// Get starting pixel address
	start_addr = gvramGetXYaddr(x1, y1);
	if (start_addr < 0){
		if (GFX_VERBOSE){
			printf("%s.%d\t Unable to set GVRAM start address\n", __FILE__, __LINE__);
		}
		return -1;
	}
	// Set starting pixel address
	gvram = (uint16_t*) start_addr;

	// Step to next row in vram
	step = (GFX_COLS - x2) + x1;

	// Draw top
	for(col = x1; col <= x2; col++){
		*gvram = grbi;
		// Move to next pixel in line
		gvram++;
	}
	// Jump to next line down and start of left side
	gvram += (GFX_COLS - x2) + (x1 - 1);

	// Draw sides
	for(row = y1; row < (y2-1); row++){
		*gvram = grbi;
		gvram += (x2 - x1);
		*gvram = grbi;
		gvram += step;
	}

	// Draw bottom
	for(col = x1; col <= x2; col++){
		*gvram = grbi;
		// Move to next pixel in line
		gvram++;
	}

	return 0;
}
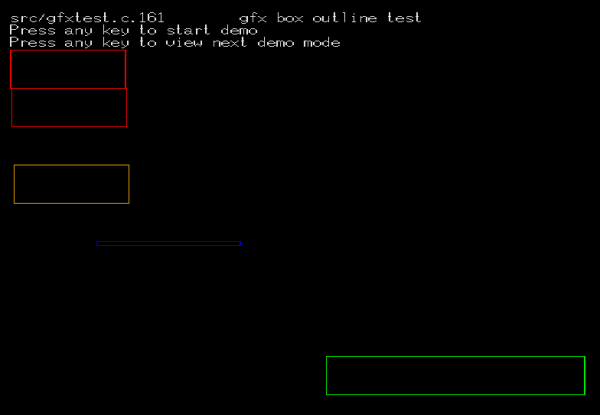
If you call the function as follows:
int red, orange, green, blueish;

red = rgb888_2grb(0xFF, 0x00, 0x00, 1);
orange = rgb888_2grb(0xFF, 0xB0, 0x0F, 1);
green = rgb888_2grb(0x00, 0xFF, 0x00, 1);
blueish = rgb888_2grb(0x00, 0x00, 0xEE, 1);

gvramBox(0, 50, 100, 100, red);
gvramBox(1, 100, 101, 150, red);
gvramBox(3, 200, 103, 250, orange);
gvramBox(275, 450, 500, 500, green);
gvramBox(75, 300, 200, 305, blueish);
You should see the following:
Note, this draws an outline of a rectangle only. For filled rectangles, look below…
Drawing a filled rectangle in GVRAM
This is actually a little bit easier than the outline rectangle version, as we don't have to keep skipping from the left side to right side:
int gvramBoxFill(int x1, int y1, int x2, int y2, uint16_t grbi){
	// Draw a box, fill it with a given grbi colour
	int row, col;		//  x and y position counters
	int start_addr;	// The first pixel, at x1,y1
	int temp;		// Holds either x or y, if we need to flip them
	int step;

	// Flip y, if it is supplied reversed
	if (y1>y2){
		temp=y1;
		y1=y2;
		y2=temp;
	}
	// Flip x, if it is supplied reversed
	if (x1>x2){
		temp=x1;
		x1=x2;
		x2=temp;
	}
	// Clip the x range to the edge of the screen
	if (x2>GFX_COLS){
		x2 = GFX_COLS - 1;
	}
	// Clip the y range to the bottom of the screen
	if (y2>GFX_ROWS){
		y2 = GFX_ROWS - 1;
	}
	// Get starting pixel address
	start_addr = gvramGetXYaddr(x1, y1);
	if (start_addr < 0){
		if (GFX_VERBOSE){
			printf("%s.%d\t Unable to set GVRAM start address\n", __FILE__, __LINE__);
		}
		return -1;
	}
	// Set starting pixel address
	gvram = (uint16_t*) start_addr;

	// Step to next row in vram
	step = (GFX_COLS - x2) + (x1 - 1);

	// Starting from the first row (y1)
	for(row = y1; row <= y2; row++){
		// Starting from the first column (x1)
		for(col = x1; col <= x2; col++){
			*gvram = grbi;
			gvram++;
		}
		gvram += step;
	}
	return 0;
}
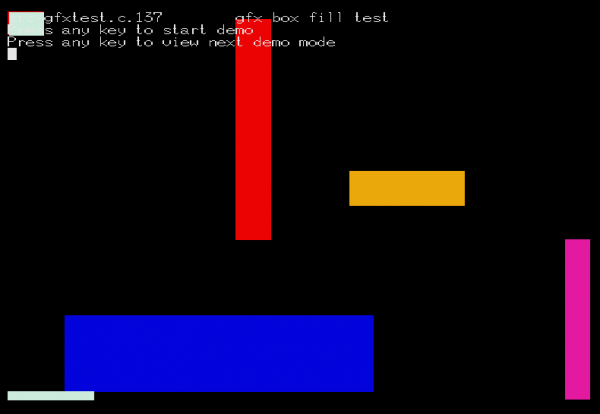
If the function is called as follows:
int red, greyish, blue, pinkish, orange;

red = rgb888_2grb(0xFF, 0xFF, 0xFF, 1);
greyish = rgb888_2grb(0xDD, 0xFF, 0xEE, 1);
blue = rgb888_2grb(0x00, 0x00, 0xEE, 1);
pinkish = rgb888_2grb(0xF0, 0x19, 0xAF, 1);
orange = rgb888_2grb(0xFF, 0xB0, 0x0F, 1);

gvramBoxFill(0, 0, 30, 30, red);
gvramBoxFill(200, 10, 230, 300, red);
gvramBoxFill(300, 210, 400, 255, orange);
gvramBoxFill(489, 300, 510, 510, pinkish);
gvramBoxFill(50, 400, 320, 500, blue);
gvramBoxFill(0, 500, 75, 525, greyish);	   // This one should be clipped at y axis
gvramBoxFill(1, 1, 31, 31, greyish);       // This one should partially obscure the red rectangle at 0,0
This should display output as follows:
Screen to Screen copy in GVRAM
This is a useful one, you can arbitrarily copy about portions of the screen without allocating buffers or space for the screen bitmap.
You need 6 parameters:
- int x1, y1 - upper left coordinates of source
- int x2, y2 - bottom right coordinates of source
- int x3, y3 - upper left coordinates of destination
int gvramScreenCopy(int x1, int y1, int x2, int y2, int x3, int y3){
	// Copy a block of GVRAM to another area of the screen
	// x1,y1, x2,x2	source bounding box
	// x3,y3			destination coordinates

	uint16_t	row;	// Row counter
	uint16_t	col;	// Column counter
	uint16_t	n_cols;	// Width of source area, in pixels
	uint16_t	n_rows;	// Height of source area, in pixels
	uint16_t *gvram_dest;	// Destination GVRAM pointer
	uint16_t width_bytes;	// Row size, in bytes
	int start_addr;		// The first pixel in source
	int dest_addr;		// The first pixel in destination

	n_cols = x2 - x1;
	if (n_cols < 1){
		if (GFX_VERBOSE){
			printf("%s.%d\t Horizontal size of source must be >0\n", __FILE__, __LINE__);
		}
		return -1;
	}

	n_rows = x2 - x1;
	if (n_rows < 1){
		if (GFX_VERBOSE){
			printf("%s.%d\t Vertical size of source must be >0\n", __FILE__, __LINE__);
		}
		return -1;
	}

	// Get starting pixel address
	start_addr = gvramGetXYaddr(x1, y1);
	if (start_addr < 0){
		if (GFX_VERBOSE){
			printf("%s.%d\t Unable to set GVRAM start address\n", __FILE__, __LINE__);
		}
		return -1;
	}
	gvram = (uint16_t*) start_addr;

	dest_addr = gvramGetXYaddr(x3, y3);
	if (dest_addr < 0){
		if (GFX_VERBOSE){
			printf("%s.%d\t Unable to set GVRAM destination address\n", __FILE__, __LINE__);
		}
		return -1;
	}
	gvram_dest = (uint16_t*) dest_addr;

	// Calculate size of copy
	width_bytes = n_cols * GFX_PIXEL_SIZE;

	// memcpy entire rows at a time
	for(row = 0; row < n_rows; row++){
		memcpy(gvram_dest, gvram, width_bytes);

		// Go to next row in vram
		gvram += GFX_COLS;
		gvram_dest += GFX_COLS;
	}

	return 0;
}
Assuming a bitmap loaded onto GVRAM (but it could just be an existing screen of data) as follows:
f = fopen("D:\\alshark.bmp", "rb");
bmp = (bmpdata_t *) malloc(sizeof(bmpdata_t));
bmp->pixels = NULL;
bmp_ReadImage(f, bmp, 1, 1);
status = gvramBitmap(200, 200, bmp);
fclose(f);
bmp_Destroy(bmp);
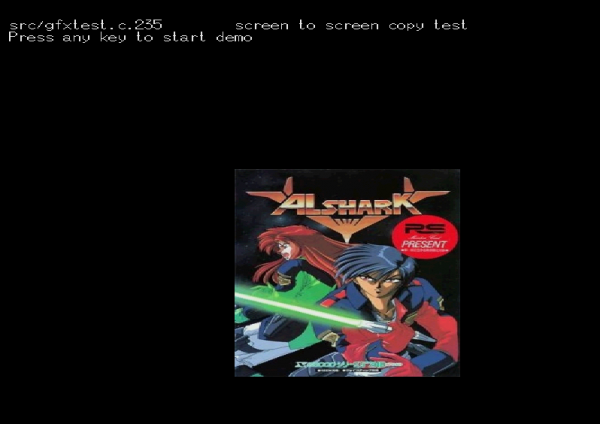
… and a screen which looks like:
… then calling gvramScreenCopy() as:
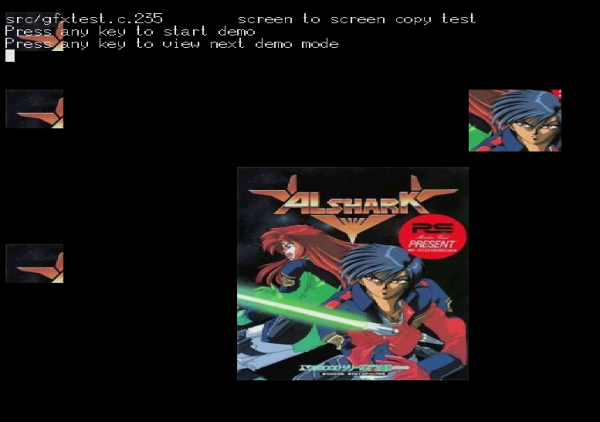
gvramScreenCopy(200, 200, 250, 250, 0, 0);     // Copies a 50x50 pixel section of the image to 0,0
gvramScreenCopy(200, 200, 250, 250, 0, 100);   // Copies a 50x50 pixel section to 0,100
gvramScreenCopy(200, 200, 250, 250, 0, 300);   // Copies a 50x50 pixel section to 0,300
gvramScreenCopy(270, 300, 350, 375, 400, 100); // Copies a 80x75 pixel section to 400,100
… will result in fragments of the video memory being copied around the screen as follows:
TVRAM Operations
TVRAM (or Text-RAM) is another area of video RAM on the X68000, distinctly seperate from the previous GVRAM we looked at above.
Text RAM is again accessed via a memory mapped address range in the X68000 address space.
1 Row 128 bytes(64 words)
| Page | Address Range |
|---|---|
| 0 | 0xE00000 - 0xE1FFFF |
| 1 | 0xE20000 - 0xE3FFFF |
| 2 | 0xE40000 - 0xE5FFFF |
| 3 | 0xE60000 - 0xE7FFFF |
Unlike GVRAM where one pixel was directly mapped to a single memory location (writing a 16bit value to 0xC00000 would set the colour of a single pixel at screen position 0,0), Text RAM is planar.
Writing a 16bit value to 0xE00000 will actually turn on and off the first 16 bits of row 0 of the screen.
For example; suppose you write the 16bit value 0xFFFF (bits: 1111111111111111), to 0xE00000. You'll get a line of 16 pixels turned on:
If you write the value 0xAAAA (a pattern of: 1010101010101010) to 0xE00000 you instead get an alternating pattern of pixels on and off:
Writing another 16bit value to 0xE20000, 0xE40000 and 0xE60000 will result in the bit patterns being overlaid and generating a different colour for those first 16 pixels.
Using this planar arrangement means you only need to write 64 x 16bit words to set every pixel in a row to be on or off… of course if you want them to be different colours you then need to write other patterns to the other text planes. It's swings and roundabouts to trade off.
TO-DO - further explanation of how the colour of the pixels is determined (palette lookup).
